How to setup an automatic proxy to access SAFE Network websites via SAFE Launcher.
Setting up an automatic proxy using a PAC file
When setting up an automatic proxy we use a PAC file to specify what rules the proxy follows. There's no need to download this file, the easiest way to set up a proxy is to point to the file using a URL.
You can do this by entering the following URL in the automatic proxy dialog in your OS, or preferred browser.
http://visualiser.maidsafe.net/safe_proxy.pac
We will copy paste this URL into the proxy configuration dialog in the guides below.
Choose your Operating System for more detail on setting up the Proxy:
Windows 10 - Proxy Setup
Windows 7 - Proxy Setup
Mac OS X proxy setup
Linux (ubuntu) proxy setup
Firefox Users:
After setting up your system proxy settings, you may need to do some additional setup if you use Firefox.
Follow the guide below:
Firefox - Additional Setup Guide
Windows 10 - Proxy Setup
1.) Click the start button and then choose settings.
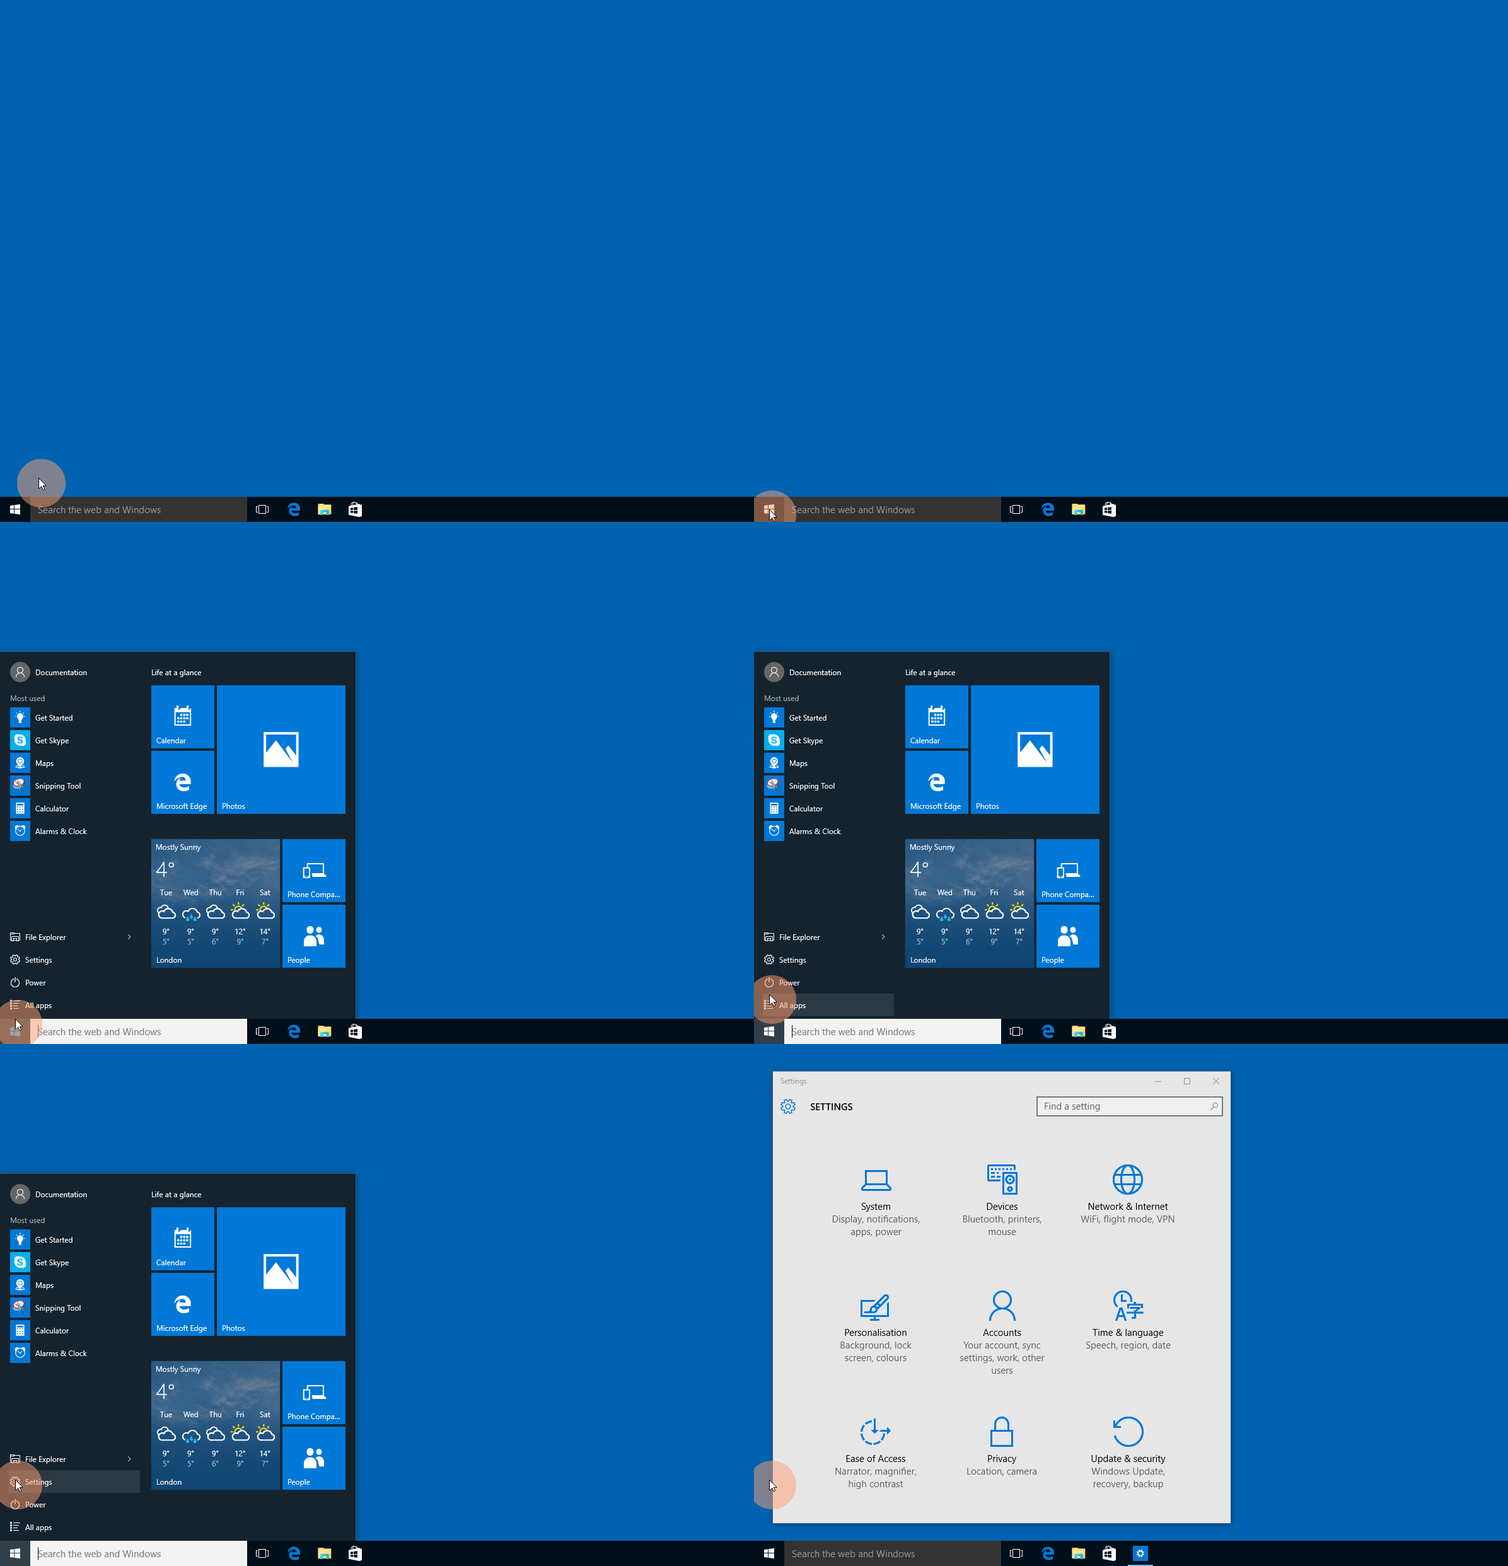
Click Start > settings.
2.) Choose 'Network & Internet' from the series of options provided.
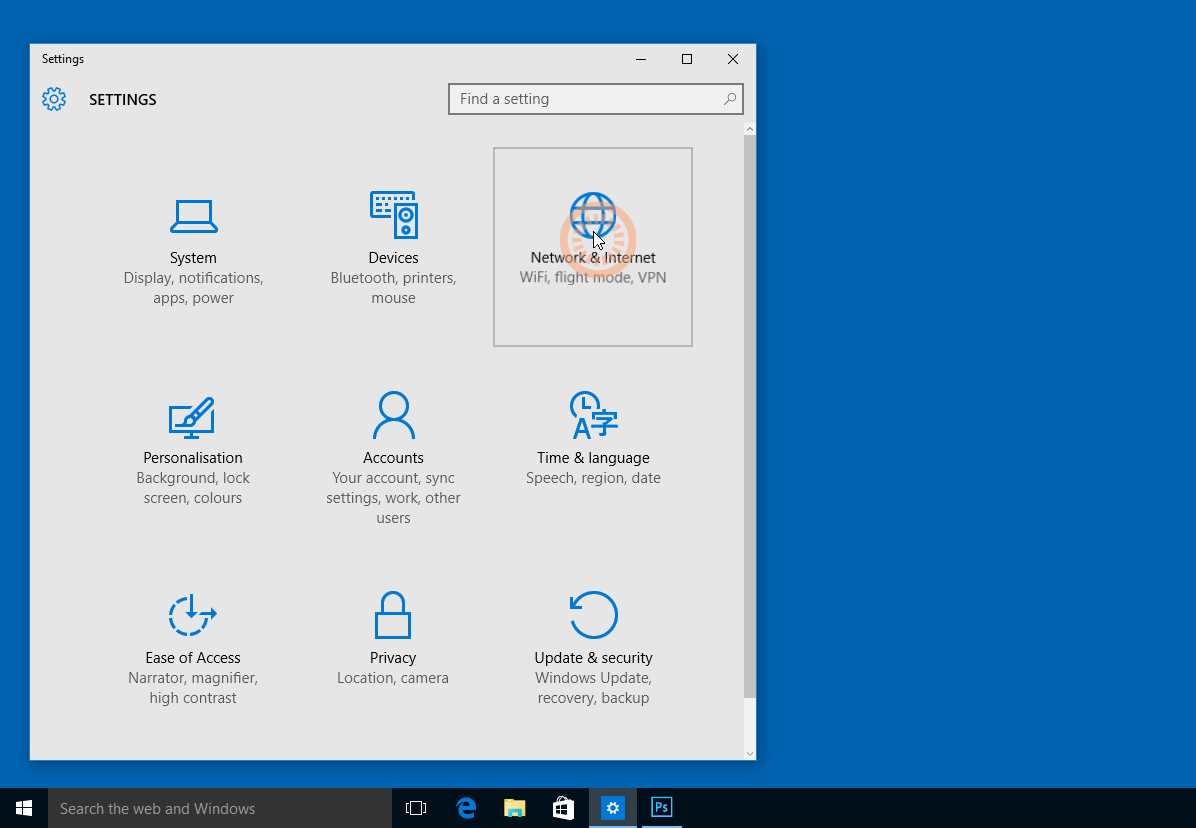
Choose 'Network & Internet'.
3.) Choose 'Proxy' from the list.
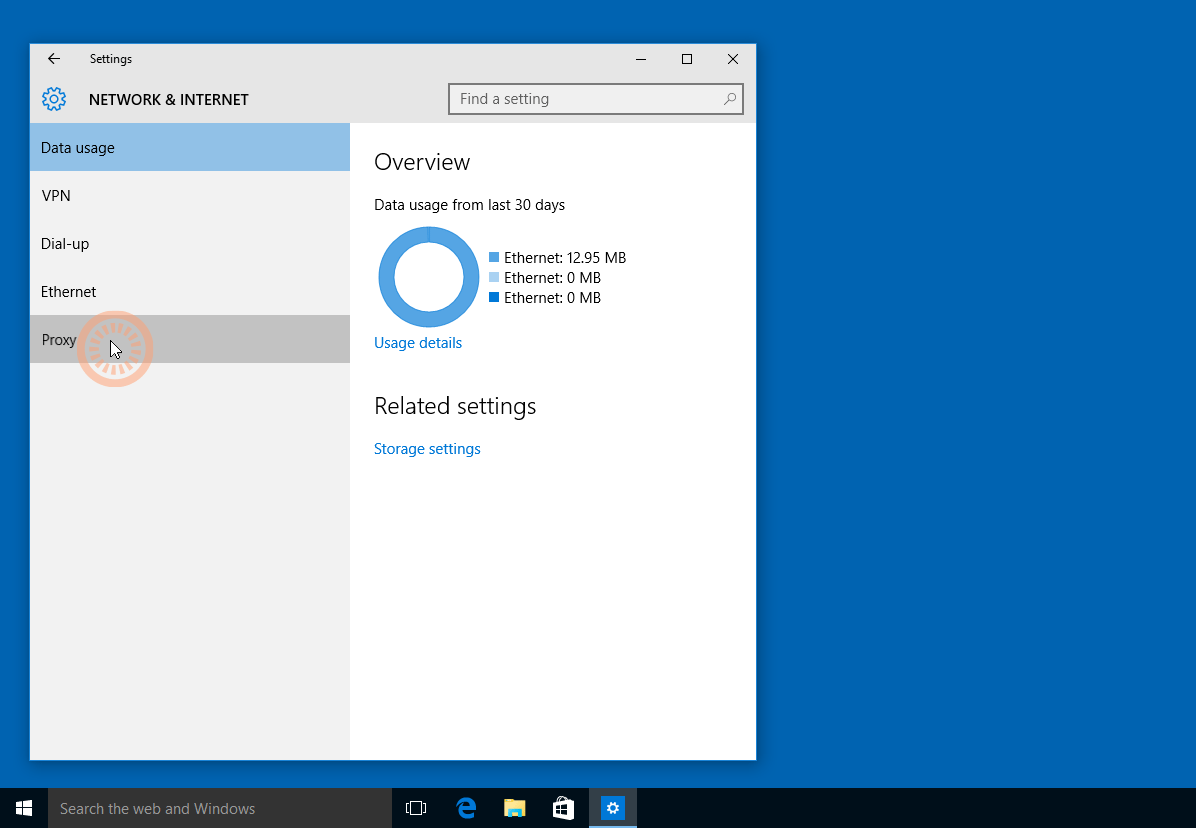
Choose 'Proxy' form the list.
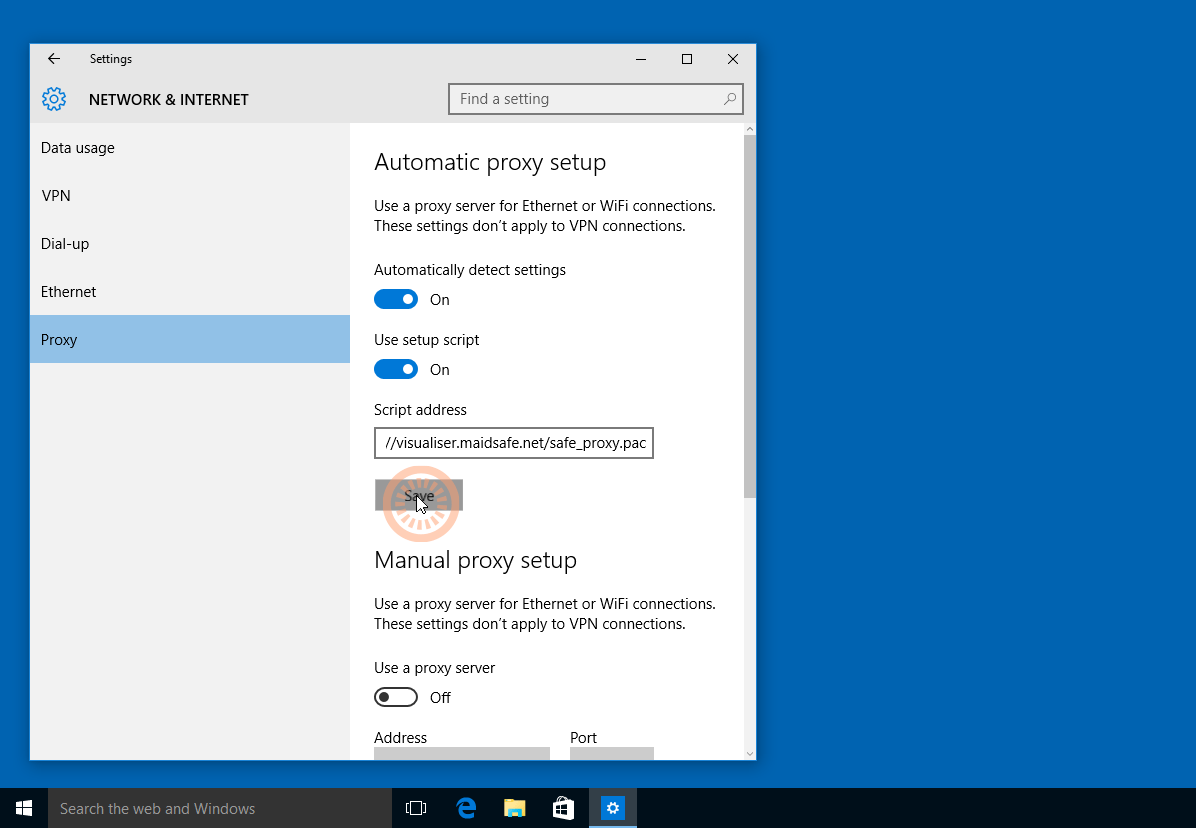
4.) Turn on the 'Use setup script' option if it's off and paste the following URL in the box titled 'Script address'.
http://visualiser.maidsafe.net/safe_proxy.pac
Paste this URL into the 'Script address' box.
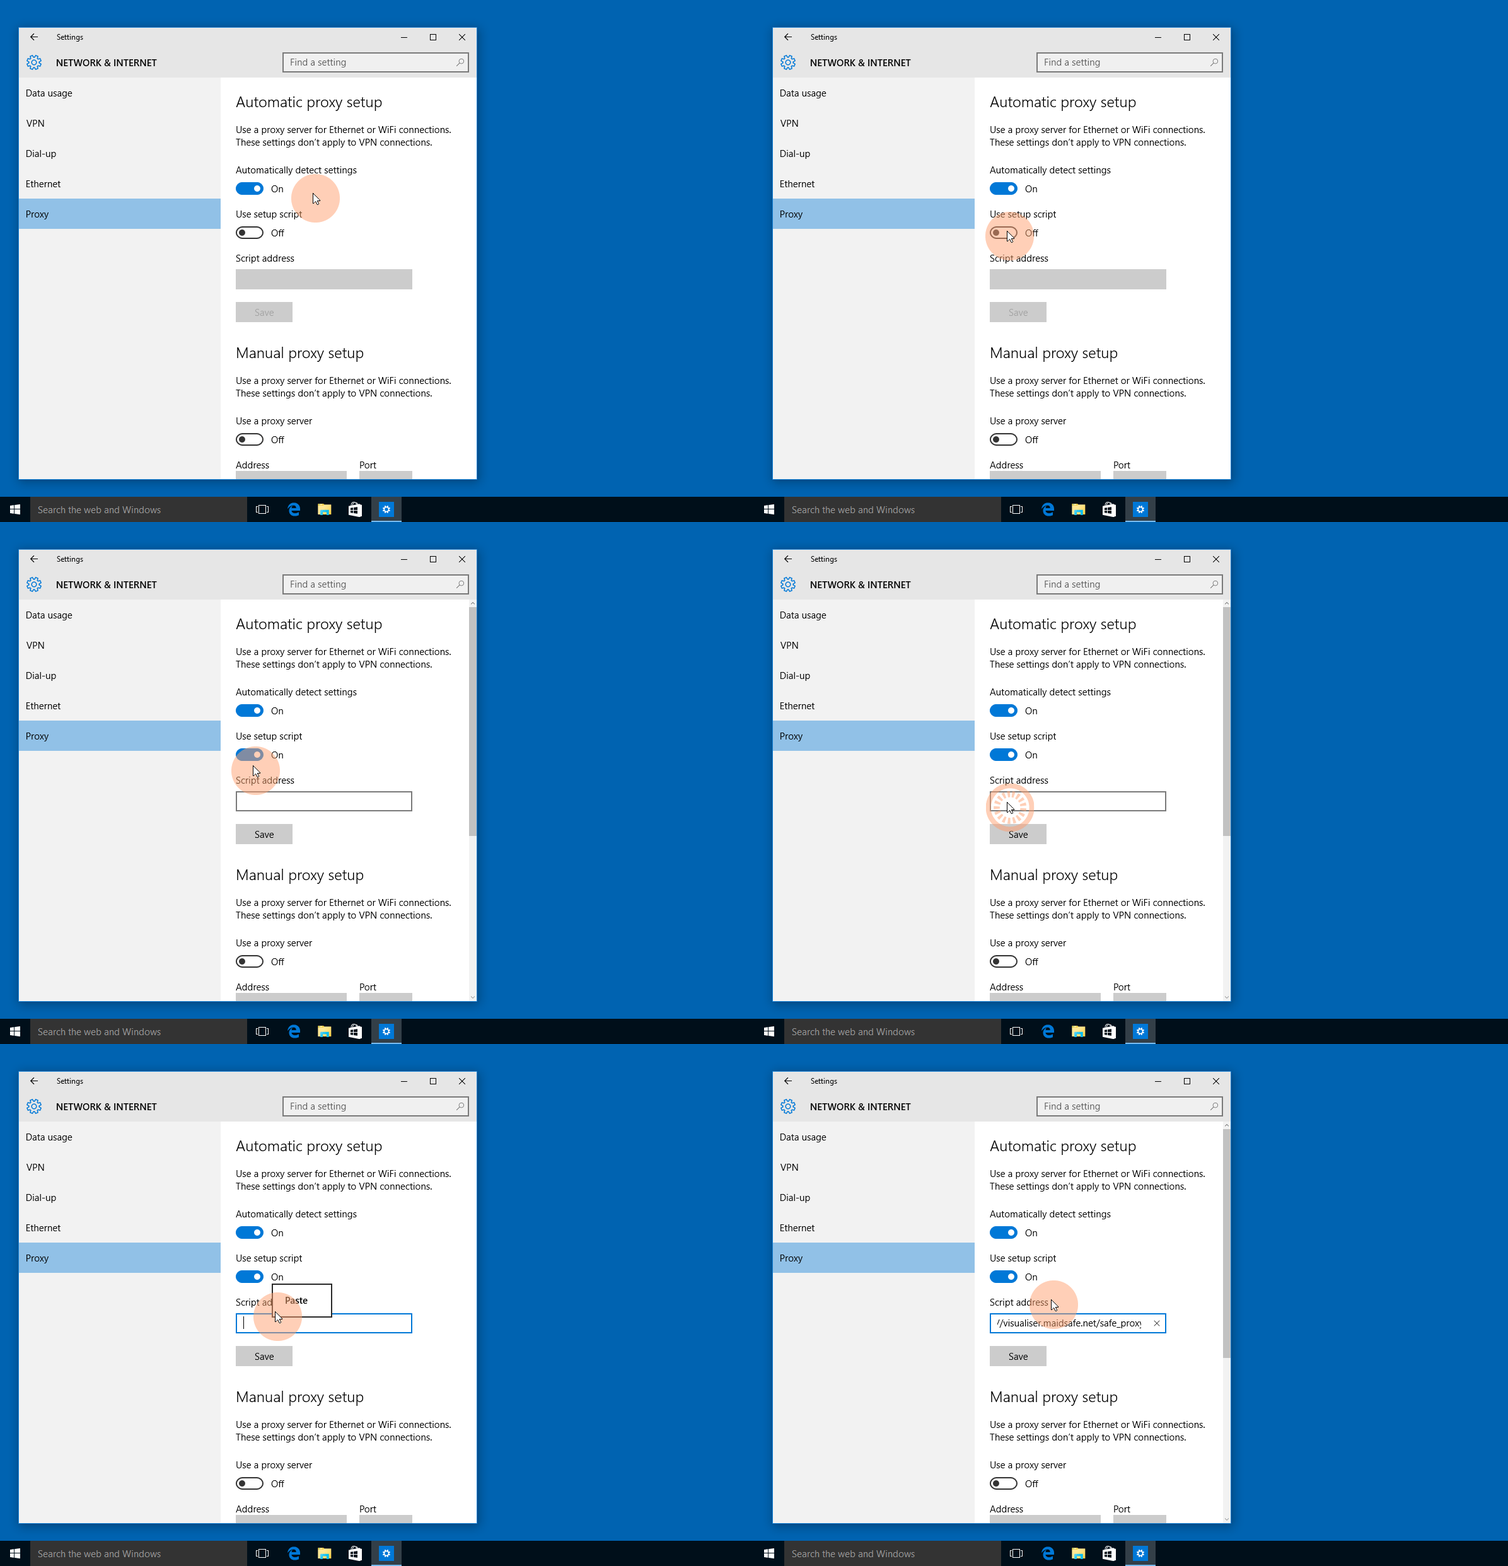
Turn on 'Use setup script' and paste in the PAC file URL.
5.) Click 'Save' to finish.
There is no confirmation that it's complete so once you've hit 'Save' you can close the Settings window.
If you use Firefox, you may need to do some additional setup.
Follow the link below for a guide on this:
Firefox - Additional Setup Guide
Test drive some of the SAFE Network features with the demo app
Windows 7 and 8.1 - Proxy Setup
This guide is for users of Windows 7 and Windows 8.1. Navigating to the Control Panel is a little different on each OS but once there the process should be the same.
Windows 8.1:
1.) Open 'Control Panel'.
You can do this by right clicking the start button (bottom left) and choosing 'Control Panel' form the context menu.

Open 'Control Panel' by right clicking the start button.
Windows 7:
1.) Open 'Control Panel'.
You can do this by clicking on the start button and choosing 'Control Panel' on the right.

Click start, then control panel.
2.) Choose 'Network and Internet' option.
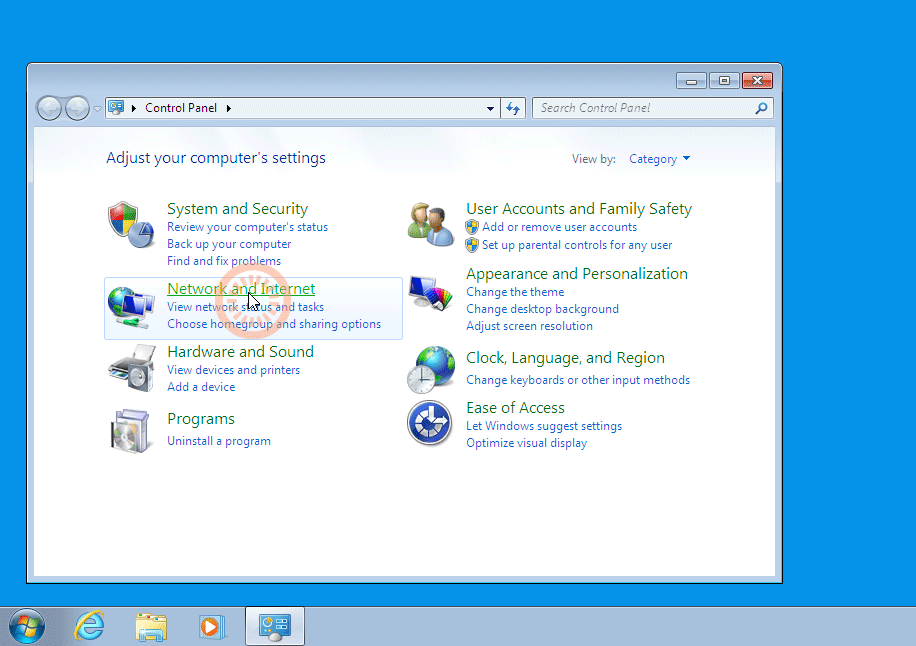
Click 'Network and Internet' option.
3.) Click 'Internet Options' this will open up in a new window.
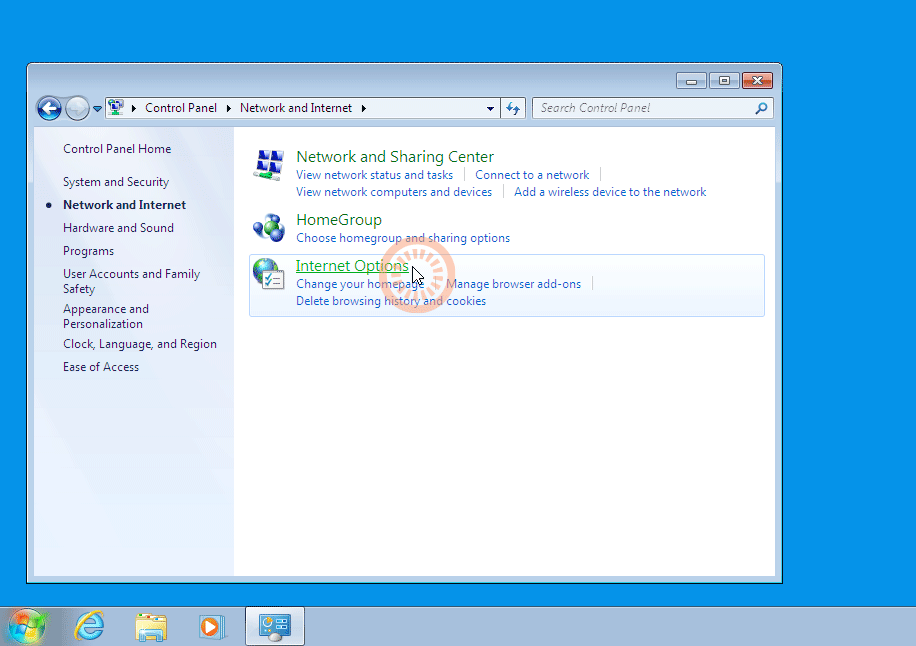
Click on internet options
4.) Click on the 'Connections' tab and choose 'LAN Settings' at the bottom of the window.
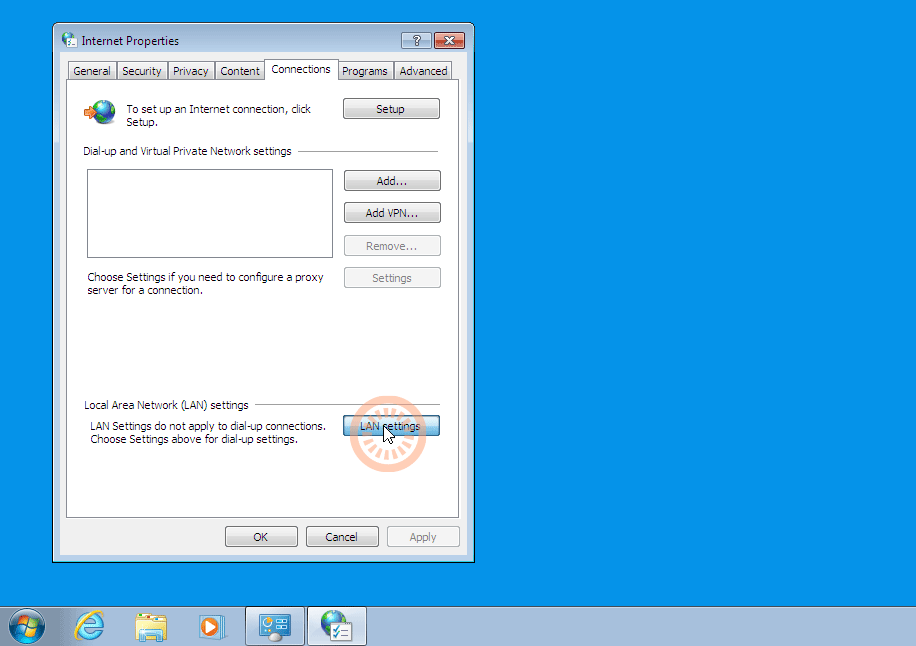
click 'LAN Settings' from the 'Connections' tab.
5.) Check the box 'Use automatic configuration script.
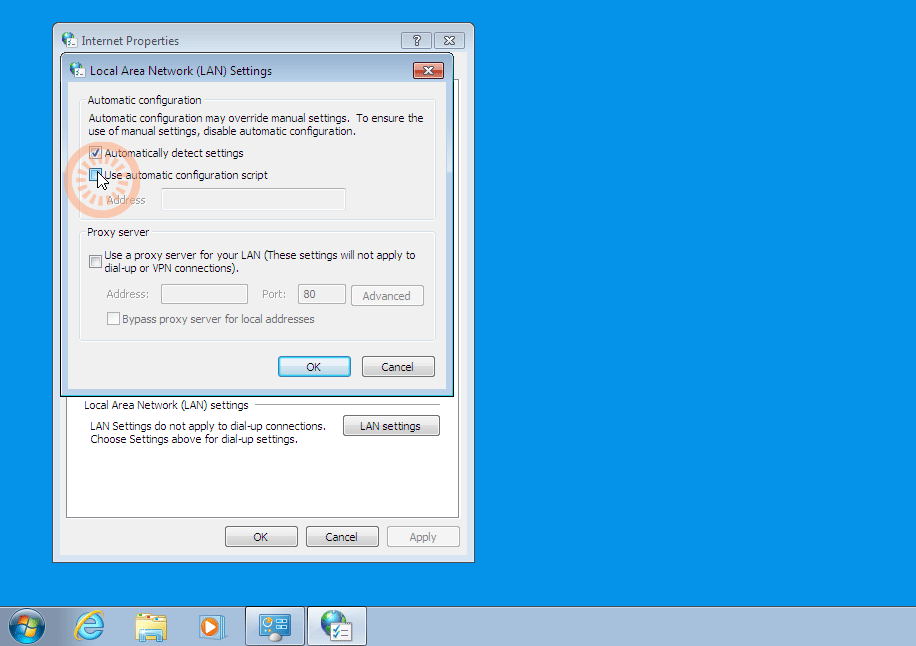
**6.) Paste the following URL into the 'Address' box under the option you just check marked.
http://visualiser.maidsafe.net/safe_proxy.pac
Paste this URL into the 'Address' box
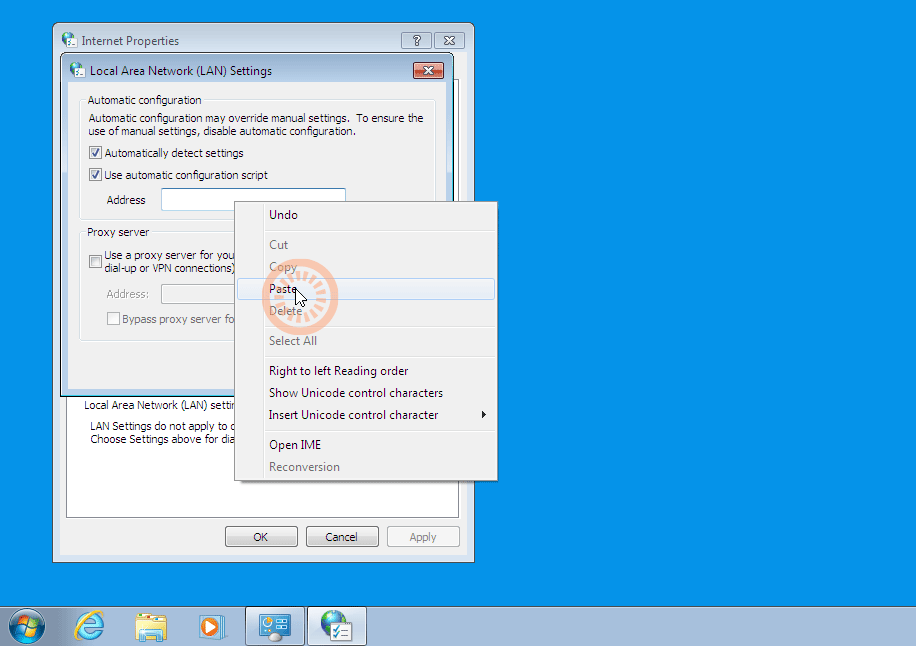
Paste the following URL into the 'Address' box.
7.) Press 'OK' and then 'Apply' to finish the setup.
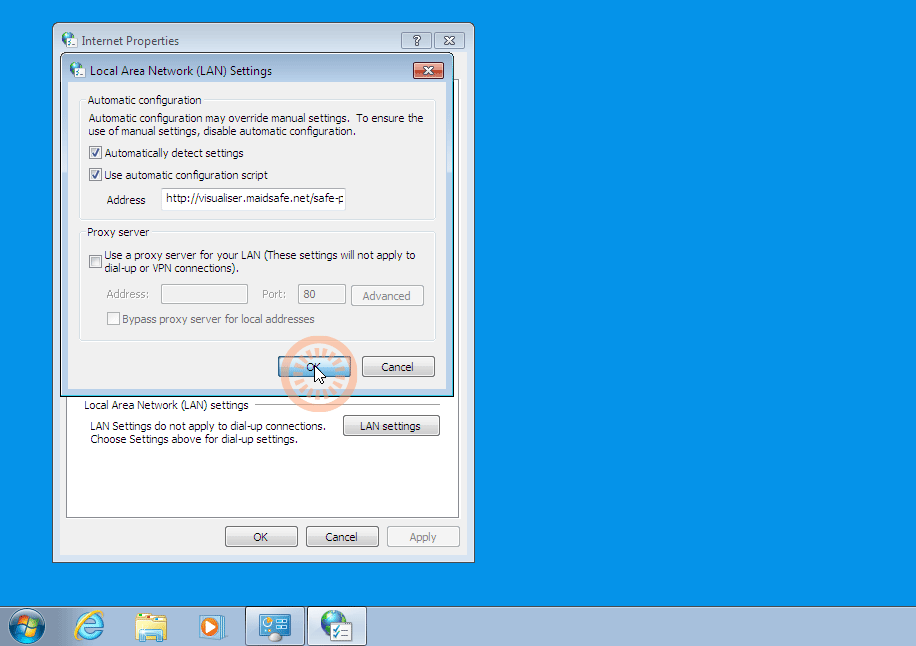
Press 'OK' and then 'Apply' to finish the setup.
If you use Firefox, you may need to do some additional setup.
Follow the link below to access the
Firefox - Additional Setup Guide.
Test drive some of the SAFE Network features with the demo app
Mac OS X - Proxy Setup
1.) Choose Apple menu and then choose 'System Preferences'.

Choose Apple menu > System Preferences
2.) Click on 'Network'.
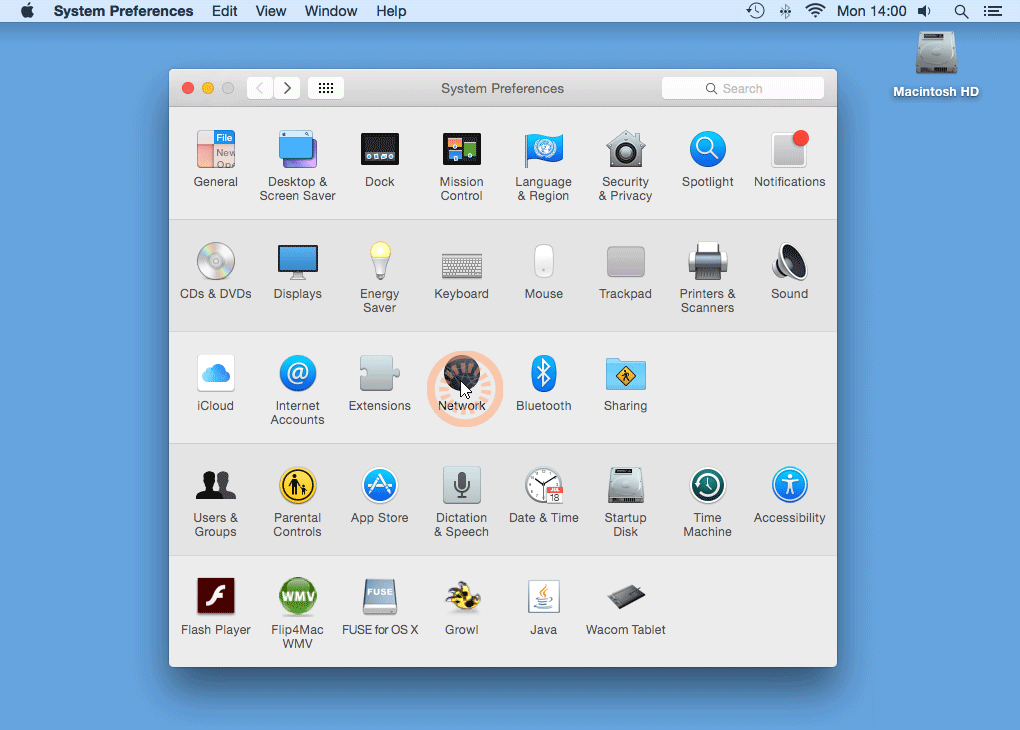
Click Network
3.) Choose the network service you use from the list.
If you use Wi-Fi choose 'Wi-Fi' or 'Airport'. If you use a lead to connect to your internet choose 'Ethernet'.
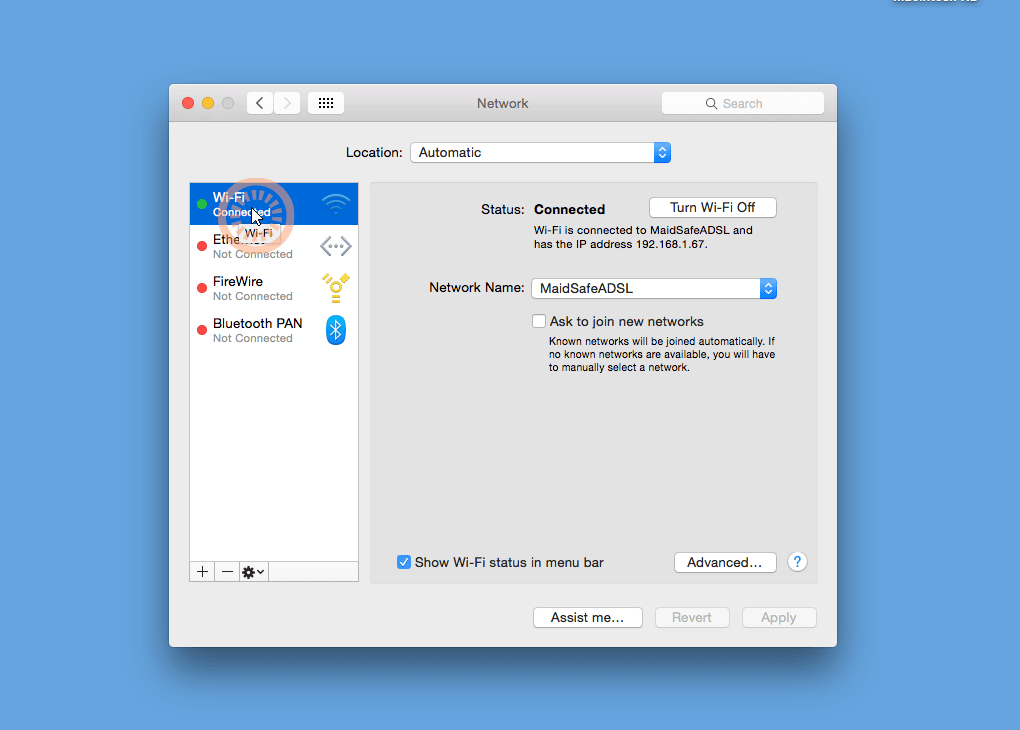
Choose the service you use
4.) Click 'Advanced', then 'Proxies'.
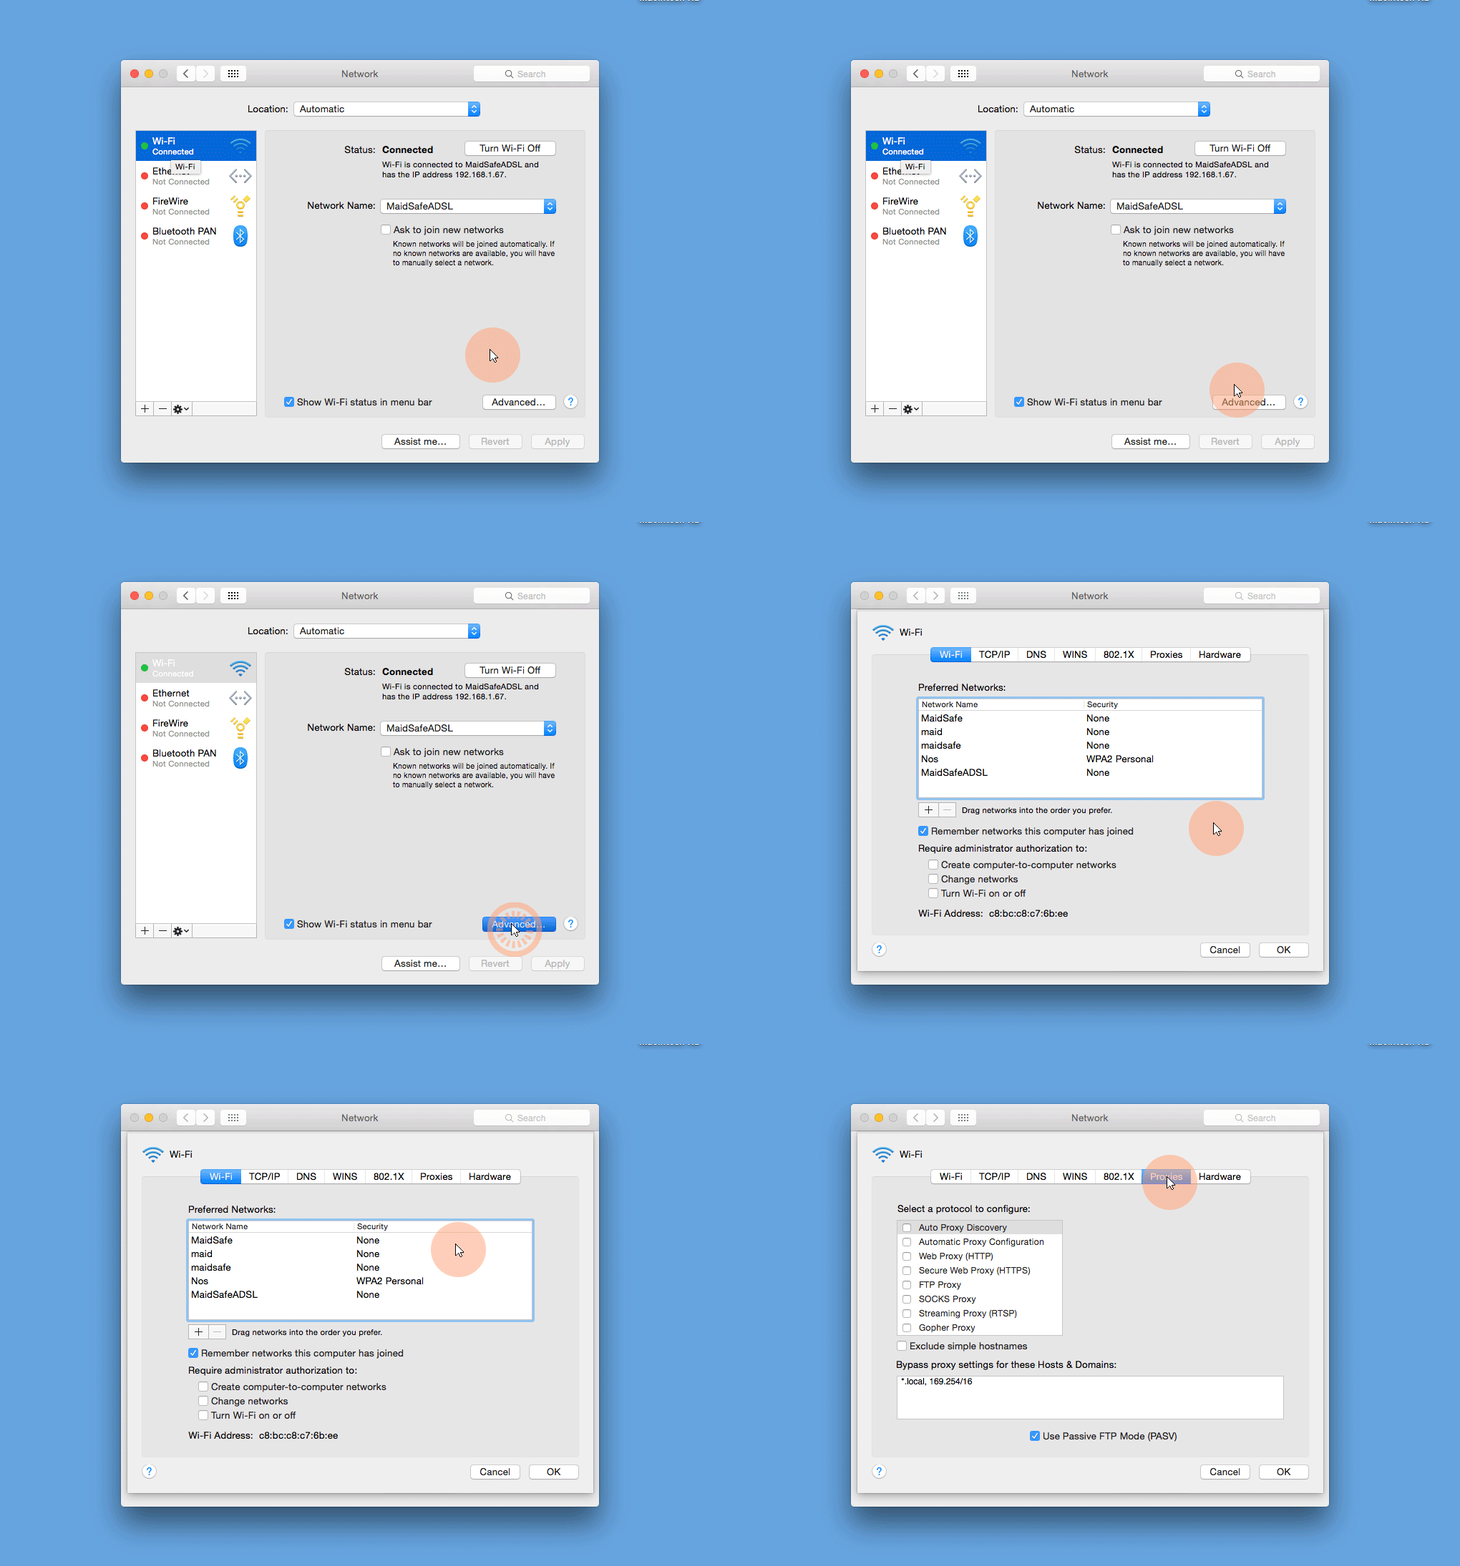
Choose 'Proxies' from the 'Advanced' menu.
5.) Select 'Automatic Proxy Configuration' from the list on the left.
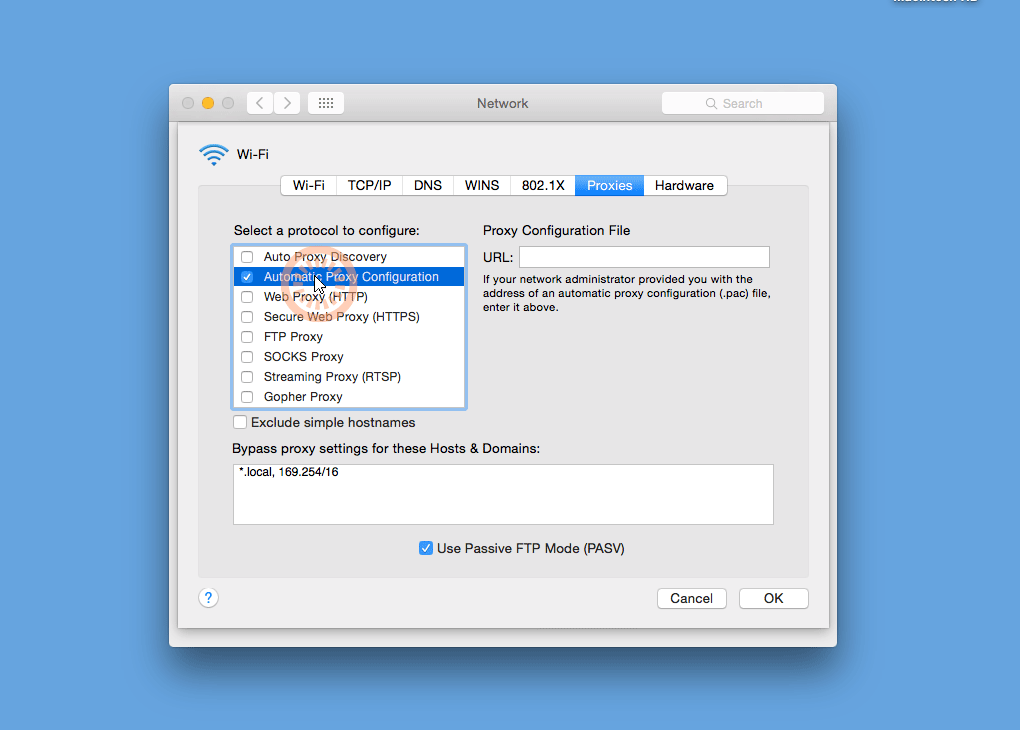
Select 'Automatic Proxy Configuration'
6.) Paste the following URL into the box under 'Proxy Configuration File':
http://visualiser.maidsafe.net/safe_proxy.pac
Paste this URL into the 'Proxy Configuration File' box.
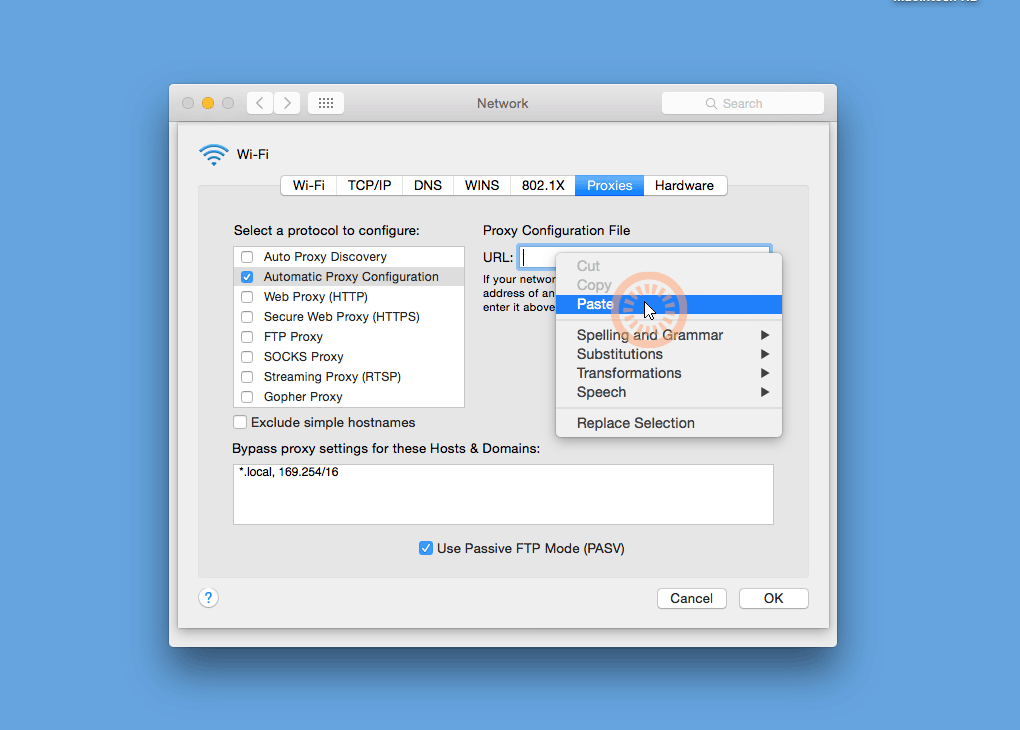
Paste PAC URL into the dialog box
7.) Click 'OK' and then 'Apply' to finish.
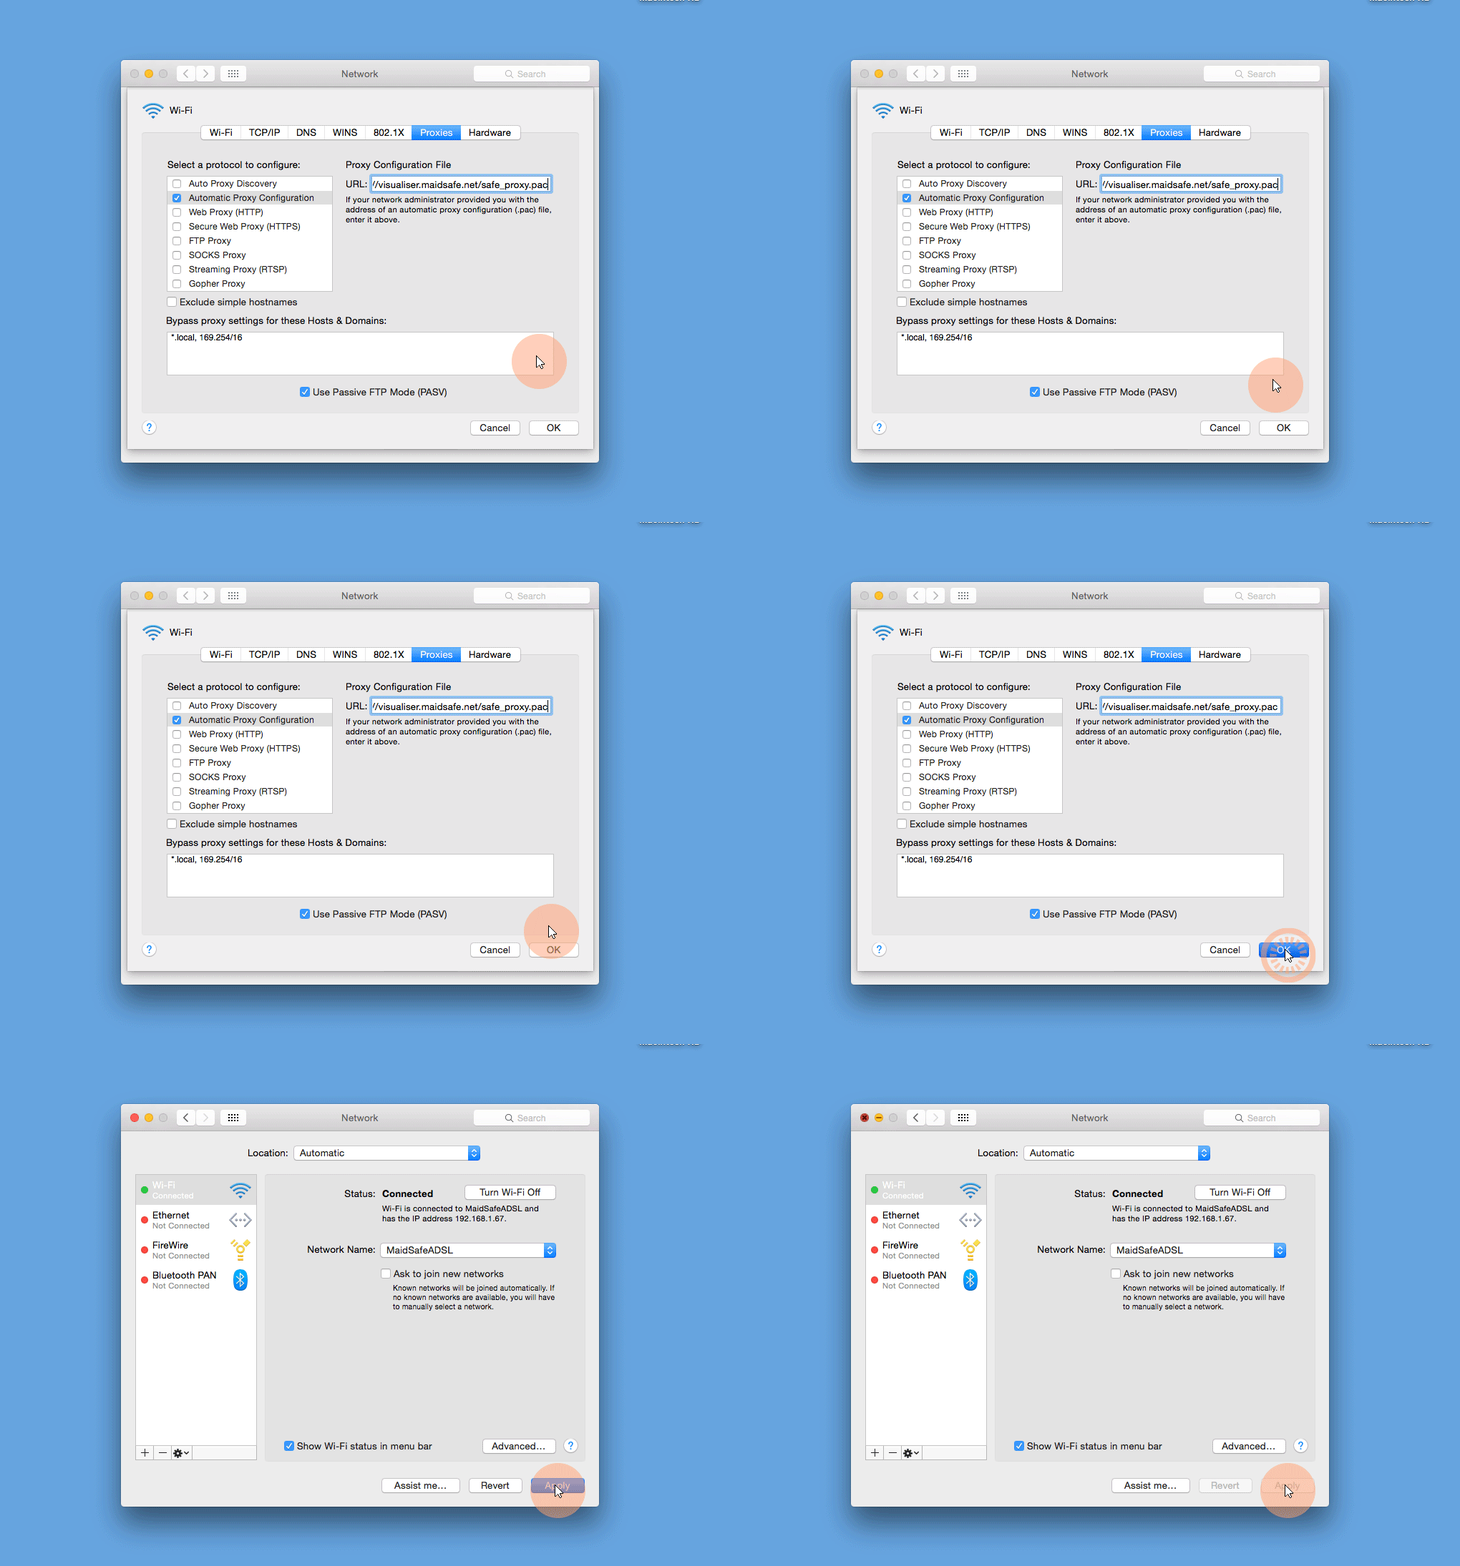
Click 'OK' and then 'Apply' to finish
If you use Firefox, you may need to do some additional setup.
Follow the link below to access the
Firefox - Additional Setup Guide
Test drive some of the SAFE Network features with the demo app
Linux (Ubuntu) - Proxy Setup
1.) Go to 'System Settings' and choose 'Network'.
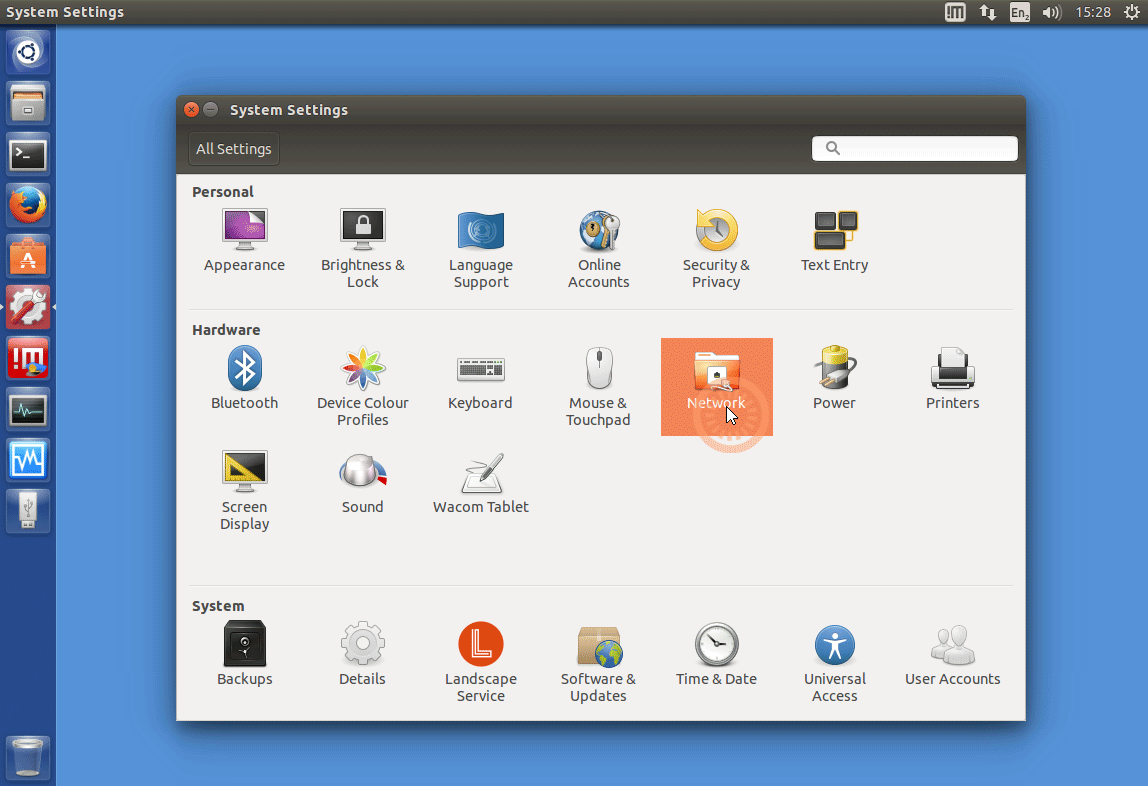
Go to 'System Settings' and choose 'Network'.
2.) Click on 'Network Proxy'.
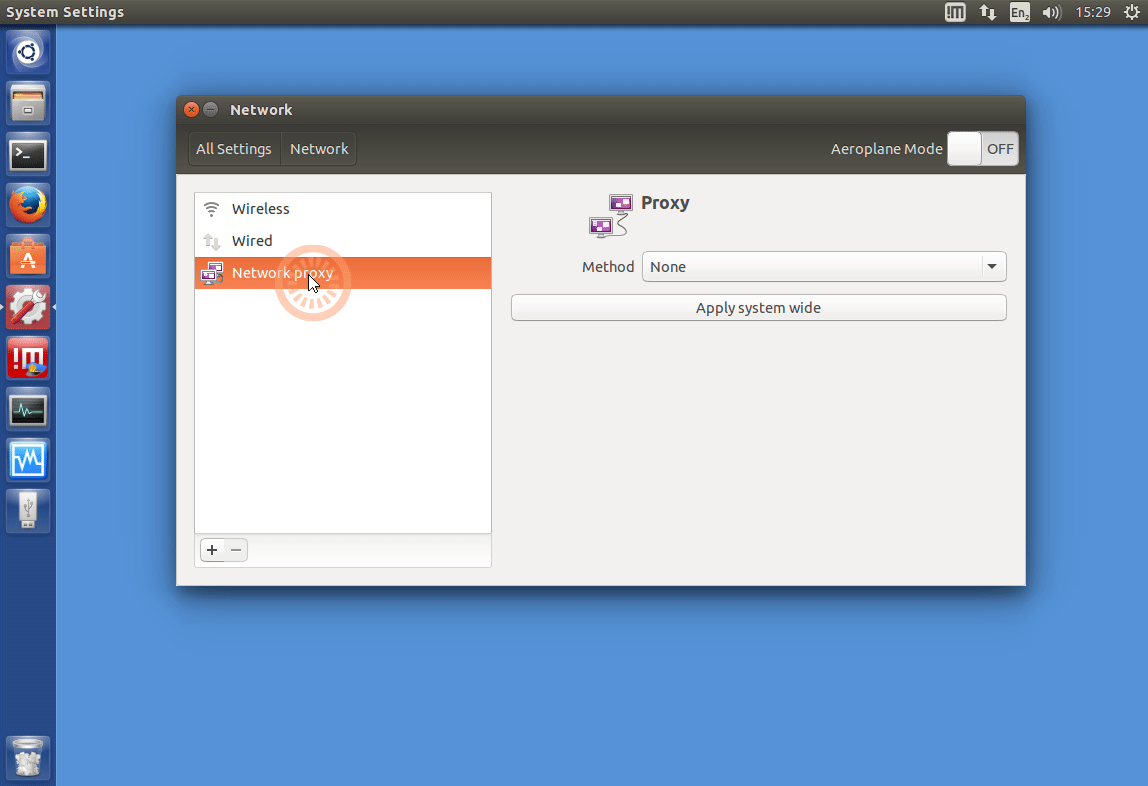
Click on 'Network Proxy'
3.) Set the Method to 'Automatic' and enter the following URL in the 'Configuration URL' box.
http://visualiser.maidsafe.net/safe_proxy.pac
Paste this URL into the 'Configuration URL' box.
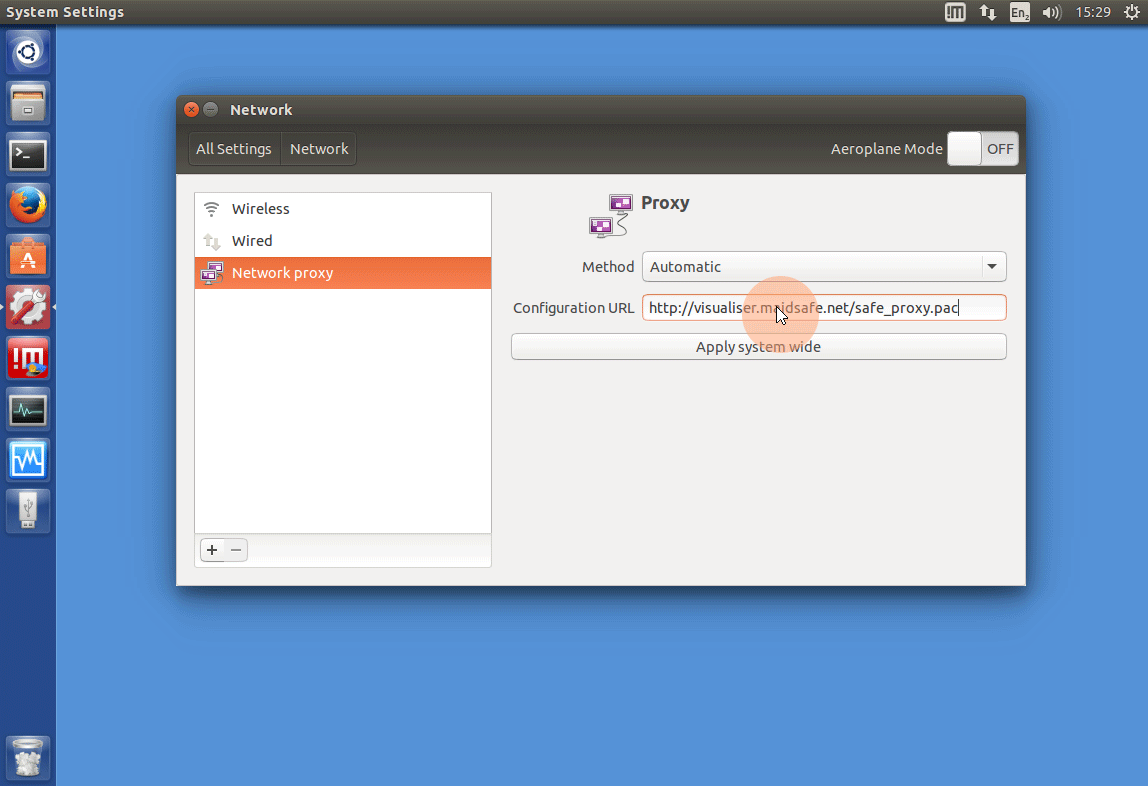
Paste the URL into the 'Configuration URL' box.
4.) Click 'Apply system wide' to complete the setup.
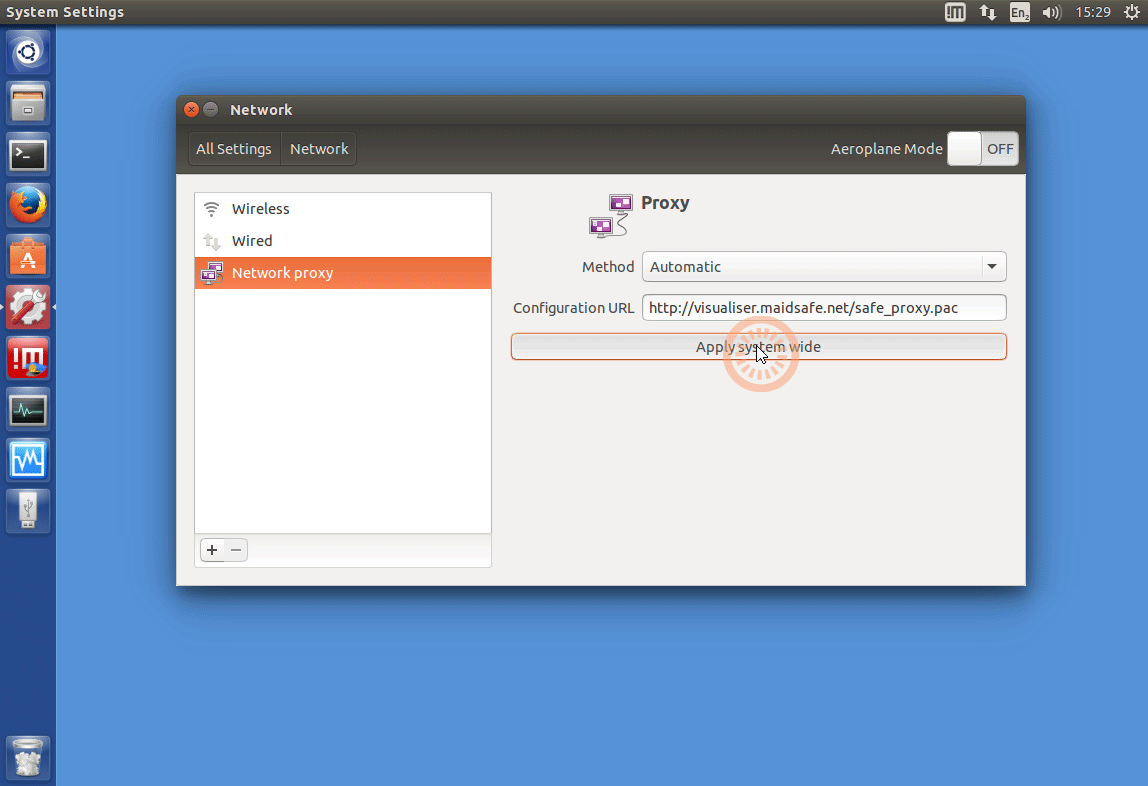
Click 'Apply system wide' to complete.
Firefox - Additional settings
This guide will tell Firefox to use the system proxy settings.
Please ensure that you've already setup a system level proxy already using one of the guides above.
To change the system proxy settings, use these guides:
Windows 10 - Proxy Setup
Windows 7 - Proxy Setup
Mac OS X proxy setup
Linux (ubuntu) proxy setup
Depending on versions and previous setup, Firefox may need to be set to use the system Proxy settings:
1.) Open Firefox and click on the settings (☰) button at the top right, then choose 'Options'
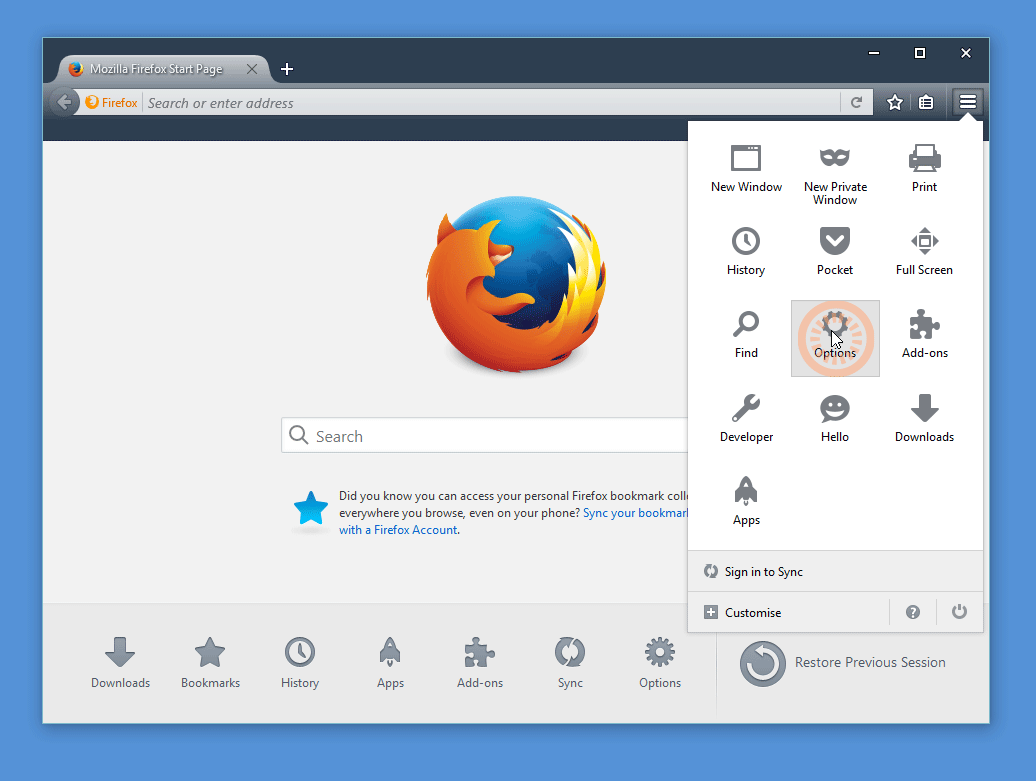
Click the (☰) button and then click 'Options'.
2.) Click 'Advanced' option on the left, then choose the 'Network' tab.
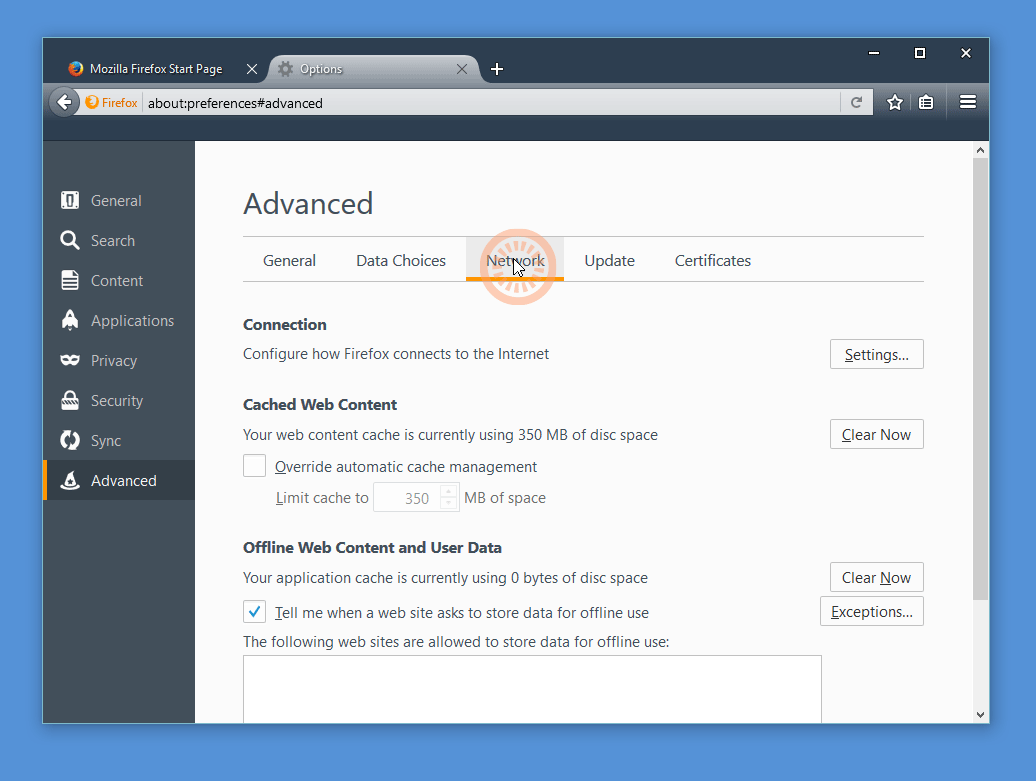
Open the 'Network' tab within 'Advanced'.
3.) Click 'Settings'
This opens a new window called 'Connection Settings'.
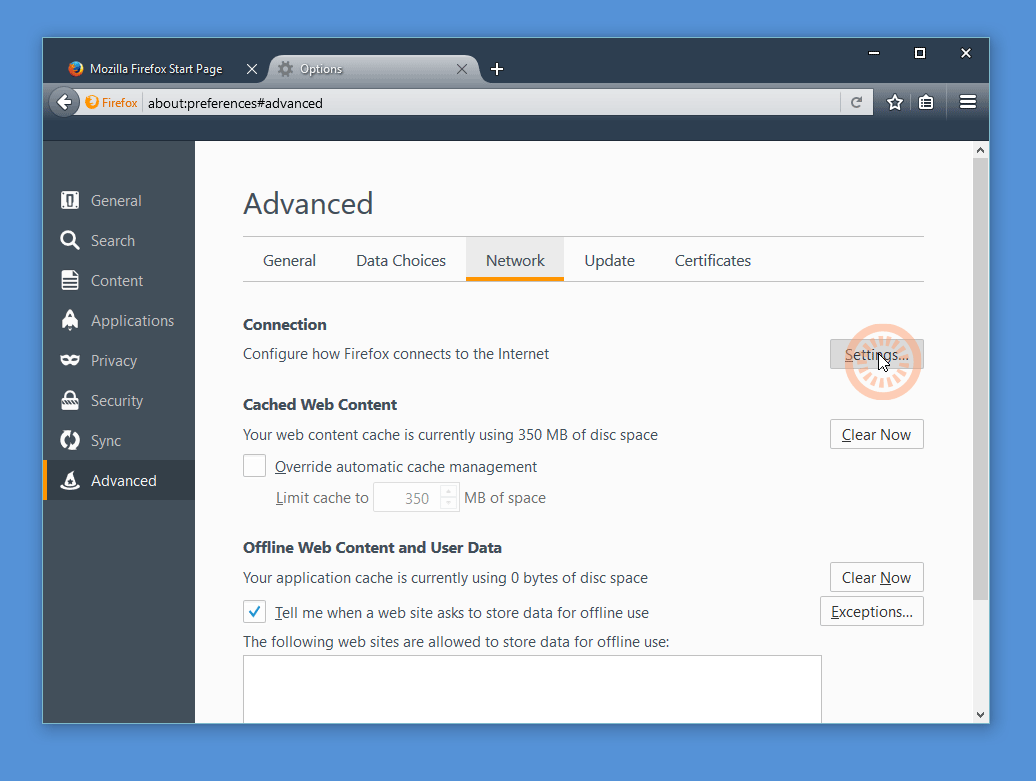
Click 'Settings'.
4.) Click on 'Use system proxy settings' and then click 'OK' to finish the setup.
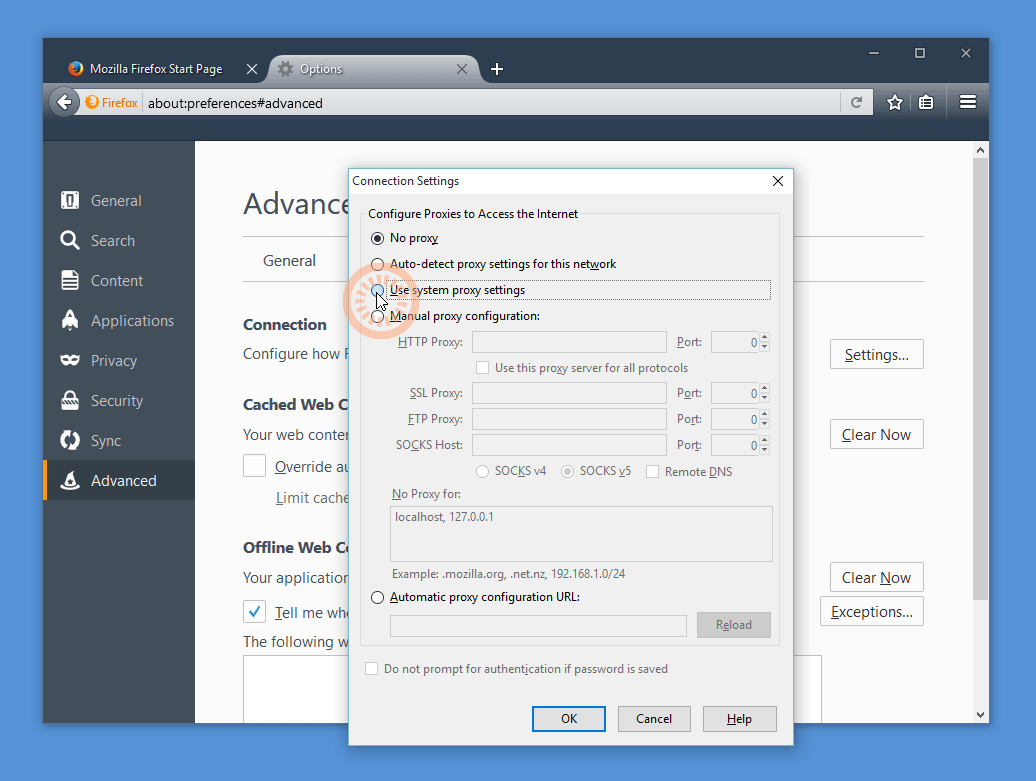
Use system proxy settings
Test drive some of the SAFE Network features with the demo app
